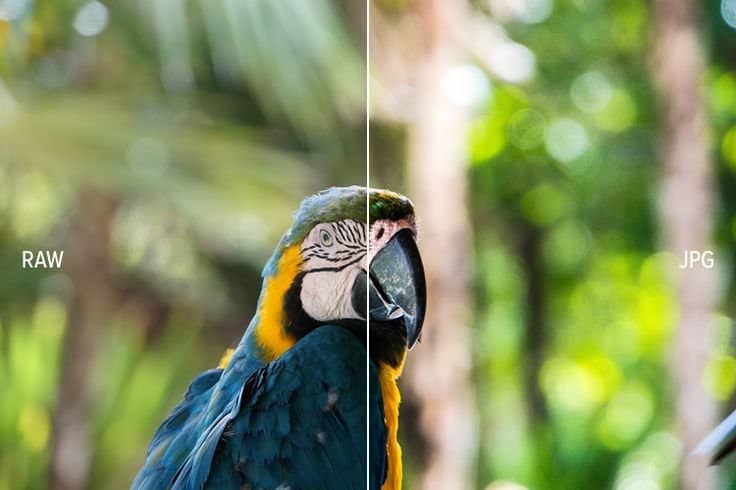
RAW Processing: A Guide to Stunning Photo

Imagine capturing a beautiful landscape with incredible details and vibrant colors, only to find your JPEG version looks a bit flat and lacks the magic you saw with your own eyes. This is where RAW processing comes in—an essential step for any photographer looking to elevate their work. RAW files, unlike JPEGs, capture all the raw data from your camera’s sensor, giving you the freedom to shape your photo without losing quality. With RAW processing, you can recover hidden details, balance lighting, and bring out the colors you saw in real life. Let’s dive into how RAW processing works and how to master it!
1. What is a RAW File?
A RAW file is essentially a digital “negative” that retains all the unprocessed data captured by your camera sensor. Unlike compressed JPEGs, RAW files hold a wealth of information about colors, textures, and details. This means larger file sizes, but it also means far greater editing flexibility. RAW files allow for precise adjustments, making it possible to create polished, professional-quality photos.
Why Shoot in RAW?
- Better Image Quality: RAW files capture every detail, preserving textures, subtle colors, and contrasts.
- Editing Freedom: Unlike JPEGs, RAW files allow extensive edits like exposure adjustments and white balance tweaks without degrading quality.
- Rescue Details: Underexposed or overexposed shots can often be saved thanks to the dynamic range retained in RAW files.
2. Why RAW Processing Matters
Because RAW files are unprocessed, they look “flat” straight out of the camera. This is actually a good thing! It means you have total control over every aspect of the image in post-processing. With the right adjustments, you can recover hidden details, balance highlights and shadows, and fine-tune colors—resulting in a vivid, sharp, and fully-realized image.
3. Key Steps in RAW Processing
To get started with RAW processing, you’ll need editing software like Adobe Lightroom, Capture One, or Darktable. Here’s a step-by-step guide:
A. Import and Preview
- Import your RAW files into your chosen software, and take a first look. Batch import options can help speed things up, especially for large projects.
B. Exposure and Contrast Adjustments
- Start by adjusting exposure to get the lighting just right. Next, boost the contrast to add depth, making the light and dark areas stand out. RAW files allow dramatic adjustments without quality loss, so experiment to find the perfect balance.
C. White Balance Adjustments
- White balance is crucial for true-to-life colors, especially in tricky lighting. RAW files make it easy to correct any unwanted color casts, so the whites look pure and colors appear natural. From warm sunset tones to cool blue hues, a simple adjustment here can completely transform the mood of the photo.
D. Highlights and Shadows Recovery
- One of the biggest advantages of RAW files is their dynamic range. Use the highlights and shadows sliders to reveal hidden details in both the brightest and darkest parts of your photo. For instance, if the sky is blown out, lower the highlights to bring back cloud details; if your subject is in shadow, raise the shadows to illuminate them.
E. Color Enhancements with HSL
- Color can set the entire tone of your image. Use the HSL (Hue, Saturation, and Luminance) sliders to make fine-tuned adjustments to specific colors. Increase the saturation on blues for a striking sky or adjust the greens for lush landscapes—these small tweaks can make your colors pop.
F. Sharpening and Noise Reduction
- Add sharpness to enhance details, especially in textured areas, but be cautious not to overdo it. At the same time, apply noise reduction if your image was shot at a high ISO, which can introduce grain. Many editors let you control how much sharpening and noise reduction are applied to different parts of the image, helping you find the perfect balance.
G. Crop and Straighten for a Finishing Touch
- Framing and alignment matter. Cropping can help improve composition, and straightening ensures that horizons and lines are visually pleasing. Don’t be afraid to experiment here—small tweaks to framing can make a big difference.
H. Export and Save
- After perfecting your image, export it in the format of your choice, typically JPEG or TIFF. Many photographers keep their original RAW files to allow for future edits or re-edits as they grow their editing skills.
4. Pro Tips for Effective RAW Processing
- Non-Destructive Editing: Choose software that supports non-destructive editing, meaning your changes don’t alter the original RAW file. This way, you can always revert to the original if you want a fresh start.
- Presets as Starting Points: Experiment with presets—they can save time and give you ideas for different looks. Start with a preset, then make custom adjustments to achieve a unique, polished result.
- Batch Editing for Consistency: For multiple similar images, batch editing can save time and help maintain a consistent look across your shots. Apply basic settings to a group, then tweak individual photos as needed.
Conclusion
RAW processing might seem like a technical step, but it’s actually where your creativity can shine. By taking control of every detail in your photos, you can reveal hidden beauty, bring out true-to-life colors, and highlight the story you want to tell. Whether you’re a beginner or a seasoned photographer, mastering RAW processing is an investment that pays off with higher-quality, more impactful photos. Embrace the freedom of RAW processing, and watch your photos come to life like never before!
0 Komentar